Here is something that is tangentially related to hiking. Do you have any idea how to find your bearings and direction if your compass and GPS stop working? Obviously you can, because people did just that long before compasses and GPS were a thing. Polynesian seafarers successfully navigated the open Pacific 5000 years ago. That was way before Waze.
Here I’ll provide some tips that should help you survive in the worst possible hiking scenario: you get totally lost and have no power or compass. None of these methods will drop a giant pin where you need to go, but they will keep you alive if used correctly.
Before we start I want to go over some terminology you will need to understand in order for these lessons to make any sense. Firstly, the Earth is a sphere. Sorry flerfs. The equator goes around the middle of the earth and divides it into northern and southern hemispheres. North America, Europe, the Middle East, and continental Asia are all entirely located within the northern hemisphere. Australia, Antarctica, almost all of South America, and about a third of Africa are in the southern one. If you are familiar with African geography, Lake Victoria sits just about right at the equator.
Lines of latitude run east-west and divide the earth. The equator sits at 0 degrees latitude with the north and south poles at 90 degrees north and south respectively. 23.5 degrees north of the equator is a line of latitude called the Tropic of Cancer. Similarly, the Tropic of Capricorn sits at 23.5 degrees south latitude. The region between them is unsurprisingly called the tropics. The other important lines of latitude are the Arctic and Antarctic Circles, sat at 66.5 degrees north and south respectively. Everything north of the Arctic Circle or south of the Antarctic Circle is called polar regions. Everything between the tropics and the polar regions is known as the temperate region. Although I’m not sure how many people would describe Duluth, MN in the winter as “temperate”.
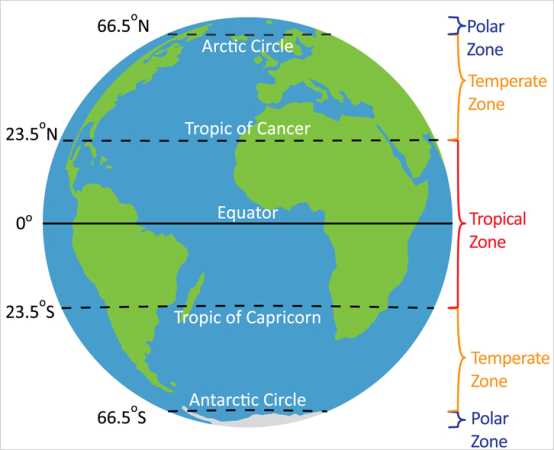
Thanks for bearing with me on that. It is important because some of these methods will or won’t work in certain regions because of spherical geometry. There are also quite a few cases where you’ll need to do something one way in one hemisphere and then do it “backwards” in the opposite one.
Generally speaking the best conditions in which to have no idea where you’re at are clear, sunny days. Barring that, the next best thing is a cloudless night with as many stars visible as possible. The worst conditions are overcast days and nights. This makes sense since the main ways to orient yourself involve using the sun and prominent stars. With that in mind, we’ll go over tips that you can use when conditions vary from best to worst.
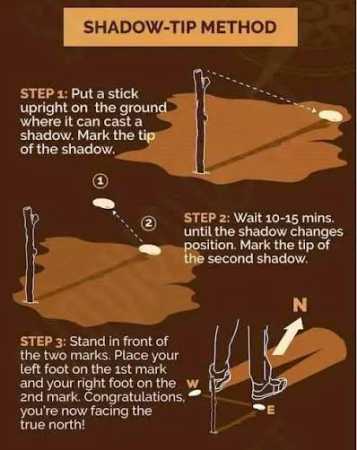
First up is the shadow tip method. This works during the day and you only need enough sun to be able to cast a shadow, even if it is a faint or intermittent one. Place a stick vertically into the ground and put a small rock where the end of the shadow falls. This is your WEST. Wait patiently for 15 minutes or so until the shadow has moved a few inches and then place another rock on the new shadow tip. This is your EAST. Draw a line between the two rocks. Stand with your left foot on the west rock and your right foot on the east rock. Straight ahead is NORTH and behind you is SOUTH.
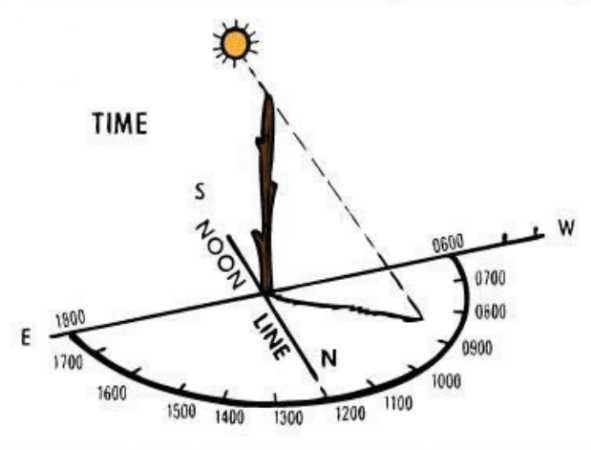
You can draw a north-south line perpendicular to your east-west line. Put a second stick vertically into the ground at the intersection of those lines. Cant the stick slightly towards north in the northern hemisphere or towards south in the southern hemisphere. Draw a semicircle going from 0600 in the WEST to 1800 in the EAST. The shadow of that second stick will give you a rough approximation of the current hour. This method is more accurate the closer it is to noon and the closer you are to an equinox.
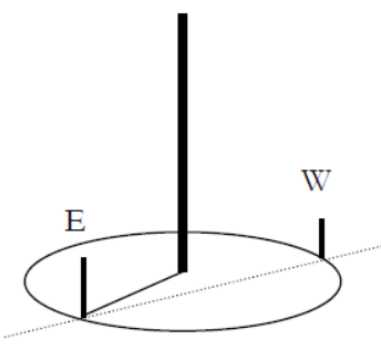
There is an advanced version of the shadow tip method called equal shadow method. For this to work, you need to begin within ten minutes before solar noon (when the sun is at its highest point). Just like before you put a stick in the ground, but you need to make sure the shadow it casts is no more than 12 inches long. Mark the tip of the shadow with a rock; this will represent WEST again. Using a piece of string, trace a circle around the stick with radius equal to the length of the shadow.
As noon approaches, the shadow will decrease in length and then start to increase again. Mark where the shadow touches the circle again; this is EAST. From here you can discern NORTH and SOUTH the same way as before.
Equal shadow method is more accurate than shadow tip, but at the cost of taking longer, using an extra piece of string, and needing to be done at a certain time of day. Both shadow tip and equal shadow can be done anywhere on earth, but they are much less reliable in the polar regions due to the position of the sun in the sky.
Maybe you don’t like sticks. Then this next method is for you. It is called the watch method. You need to be able to read an analog clock face, which might eliminate any readers under the age of 35. If you do not have a watch, you can draw a picture of a watch showing the current time so you still need to know the exact time. One last thing is you need to be using standard time, so if you are on daylight savings then move the watch back one hour.
This is hemisphere dependent. If you are in the northern hemisphere, take your watch or picture of the clock face and aim the hour hand at the sun. Midway between the hour hand and 12 will be SOUTH. If you are in the southern hemisphere, point 12 at the sun. Midway between 12 and the hour hand will be NORTH. This method requires you to be able to see the sun and only works in the temperate zones.
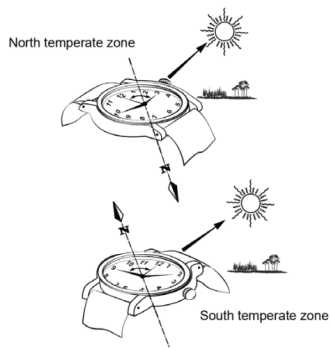
Next up, let’s go over what you do during the roughly 50% of the time that there is no sun. At night your best friends will be the North Star and the Southern Cross.
The North Star (Polaris) is a part of the Little Dipper (Ursa Minor) constellation and always sits in the direction of NORTH. A good way to find it in the night sky is to remember that it sits as many degrees above the horizon as degrees you are above the equator. For example, at the north pole Polaris is directly overhead (90 degrees) and at the equator it sits right on the horizon (0 degrees). In Austin you can find it about 30 degrees above the horizon, or a third of the way up. Once you find the North Star you can use it to orient yourself and find the other cardinal directions.
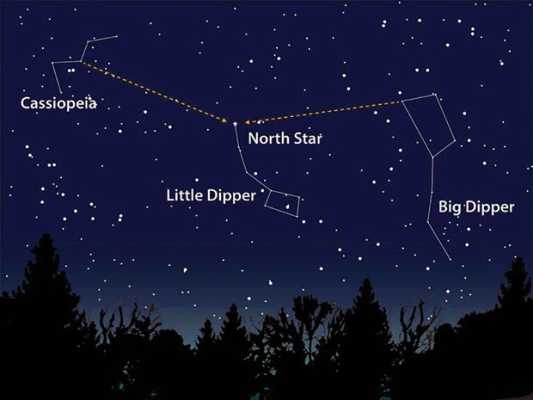
The Southern Cross (Crux) is a constellation seen only in the southern hemisphere. But if you’ve ever seen the Australian flag you know what it looks like. Fortunately, it contains four of the brightest stars in the southern hemisphere. Now it would be very simple and elegant if I could tell you something like how the Southern Cross sits exactly at south the same way Polaris sits at north. Sadly, this is anything but simple and elegant.
To find south using the Southern Cross you have two options. First, you can extend the long axis of Crux out for another 4.5 lengths and that will end above south. If you don’t want to do that, you will need to find another constellation called Centaurus. Two stars in Centaurus (Alpha and Beta Centauri) can be used as pointer stars. Draw an imaginary line segment between those two stars. Extend a perpendicular line from the midpoint of that segment; where it crosses the extended long axis of Crux will be SOUTH.
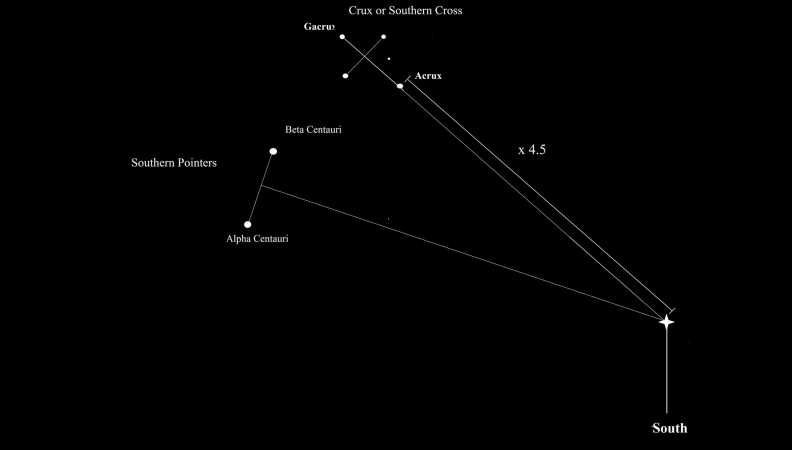
Like I said, this method is anything but simple and elegant. For the sake of simplicity, try to get hopelessly lost at night in the north if you can. Both of these methods work in any region but the constellations are tougher to see the closer to the equator you are. Also, you should stop and recalibrate often, especially in the southern hemisphere.
The next nighttime navigation method requires more materials but does not require you to identify any stars or calculate the lengths of any major axes. It also works the same way in both the northern and southern hemispheres. This method is called LURD, which stands for Left Up Right Down.
You identify a star, pretty much any star except Polaris. Place a stick vertically into the ground so that its tip is at eye level while seated. About 2 feet or so is an ideal stick length. Pick your star of interest and line it up so it is at the tip of the stick while you are seated. Now take a second stick, about 3-4 feet long. Line that stick up behind the first one so that the star is located on the tip of both sticks while you are seated.
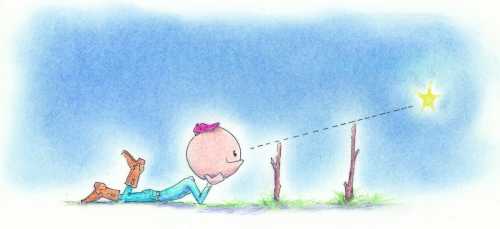
Good. Now wait about thirty minutes. In that time, your star of interest will have moved. Figure out which way it moved and use LURD to figure out which way you are facing.
- If the star moved LEFT, you are facing NORTH
- If the star moved UP, you are facing EAST
- If the star moved RIGHT, you are facing SOUTH
- If the star moved DOWN, you are facing WEST
If the star moved up and right, it means you are facing to the southeast. If it moved left and down, you are facing northwest. This method consumes a lot of time both in the waiting for the star to move and in setting up the two sticks correctly.
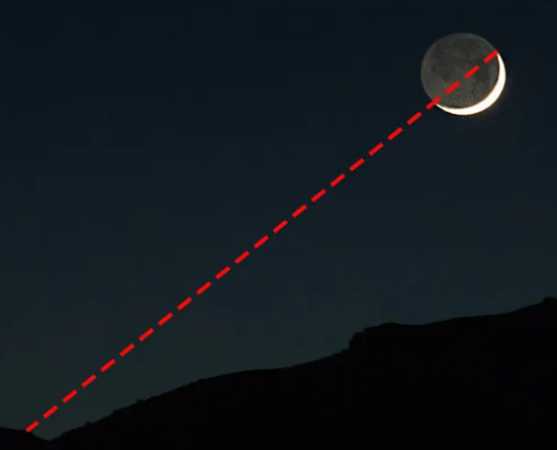
There is one last method you can use on a clear night. This is called horns of the moon. This only works during a waxing or waning crescent moon, which is about one quarter of the time. Draw an imaginary line between the two tips of the crescent moon and extend that line down to the horizon. In the northern hemisphere, that point on the horizon will be SOUTH. In the southern hemisphere that point will be NORTH. Doesn’t work during a full moon for reasons that should be obvious.
Now let’s look at what to do if it is too cloudy to see the sun or the stars. Your best bet is to use clues from nature. These are obviously going to lead to sub-optimal results, so anything you glean should be double checked as soon as you can get somewhere without cloud cover.
Firstly, a “DON’T”. Don’t use the old wives’ tale about moss growing on the north side of trees. Moss is promiscuous and grows everywhere it feels like, as long as it gets enough sun. Seeing moss is not a reliable enough indicator of north to start trekking off in whatever direction it indicates.
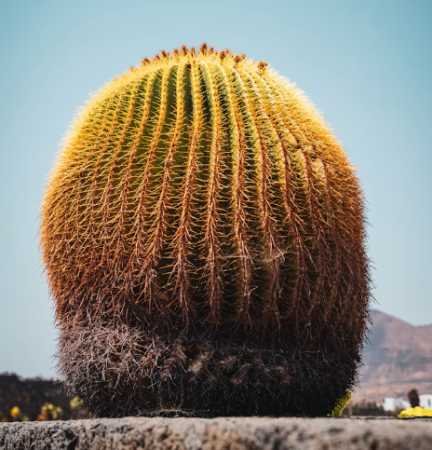
In the early summer, north-facing hillsides will retain snow longer than southern facing ones in the northern hemisphere. In the southern hemisphere, the opposite is true. Tree stumps will have wider spaced growth rings on whichever side faces the equator. So, south in the northern hemisphere and north in the southern. Barrel cacti in the Mojave (southwestern USA) grow towards the south.
Lastly, I’m going to discuss improvised compasses. I am going to talk about these last because I have the least amount of confidence in this method of finding your bearings. Basically, only try this if every single method listed above has proven ineffective. I have never gotten an improvised compass to tell me anything useful about which way anything was.
You can magnetize a needle by rubbing it with a magnet or, barring that, a piece of silk or fur. You will need to rub the needle at least 50 times in the same direction in order to magnetize it. Then you will want to carefully lay the magnetized needle on top of a leaf in a puddle or pool of water. If you wait, the needle will align itself along a north-south line.
For obvious reasons, the puddle or pool needs to be as far removed as possible from any metallic or magnetic items like cars, camping gear, bleachers, or the magnet you used to magnetize it in the first place. Again, I have never gotten this to work for me. But if you are so desperate you got all the way to this part of the post, you might as well try it.
One last thing. I used some pictures here that I got from ATP 3-50.21, an Army Training Publication that is freely available to the public. It has to do with survival in all sorts of conditions and I’d recommend downloading it. Doubly so if you plan to find yourself in an Alive or The Mountain Between Us type situation.
 Gene Hikes the Appalachian Trail
Leave a comment